It was flattering to see a pattern that fellow club member Steve Hanson and I had created appear in a recent edition of the Kamloops Flyfishers newsletter. Good friend Brian Chan had supplied the pattern to the Kamloops club. I had extolled the virtues of this pattern to him after our club fishout last year on White lake and provided him with a few samples to try. As many of you know I have made bead head fly patterns an important addition to my arsenal of chironomid patterns. The Collaborator is no different.
Steve and I came up with this pattern over breakfast one morning. Due to our collaborative efforts I christened the pattern the "Collaborator". Stomach samples the previous day had shown the fish to be feeding upon a light orange brown chironomid pupa with a prominent red butt. Local anglers often refer to pupae of this color as the "carrot" chironomids. The red butt of the chironomid pupa is a residual feature left over from the larval stage and is often prevalent on many species of chironomids. A size 10 or 12 pattern tied on the Tiemco 2457 hook nicely imitated these 1/2 to 5/8 inch long pupae. This is an excellent hook for all of your chironomid patterns, due to its' large gape and short shank. It hooks and holds fish remarkably well. Fish this pattern on a dry line with a leader equal to the depth of water you are fishing.
The success of this pattern is due in large part to the materials involved. We used frostbite to create the butt and body of the pattern. Frostbite is an excellent material for imitating chironomid pupa as it nicely simulates the shinny translucence of the natural pupas. The body color is a rusty brown frostbite, color number 61. The 1/8" gold bead head and copper ribbing add to simulate the trapped gases the pupa uses to ascend to the surface to emerge and sink the pattern quickly while maintaining a slim natural profile. However it was
the thread selection that put the finishing touches to the fly. As the frostbite is translucent the thread color had an effect of the overall body coloration. The light tan thread nicely complimented the body material and provided the right color match.
The Collaborator was a big hit with the fish at White lake. Tie some up and give them a try as this pattern style has many possible variations.
The Collaborator
Thread: Tan 8/0 Uni Thread
Hook: Tiemco 2457 #10-12
Rib: Fine Copper Wire
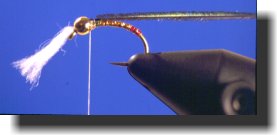
Butt: Bright red Frostbite
Body: Light Brown Frostbite (Color #61)
Thorax: Peacock Herl
Head: Gold Bead, 1/8"
Gills: White Antron or Sparkle Yarn
Instructions
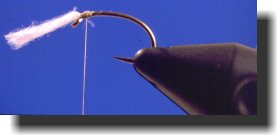
Attach tying thread to the hook at the head of the fly.
Secure one strand of sparkle yarn to the hook at the eye. The sparkle yarn should extend out over the front of the hook. It will be trimmed to length later. Whip finish thread and remove.
Slide a gold bead onto the de-barbed hook, sliding it over the buts of the sparkle yarn as close to the eye as one can get.
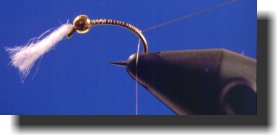
Re-attach the tying thread behind the bead.
Tie in the ribbing material directly behind the gold bead. Secure the ribbing material along the hook shank by moving the thread rearwards partially down the bend of the hook to simulate the semi curved nature of the emerging pupa.
Hold the butt material in both hands and pull, unraveling it to its full length.
Tie in two strands of the butt material and cover the rear 1/8th of the hook shank. Tie off and remove the excess butt material.
Advance the tying thread to the rear of the gold bead. Prepare the body material in the same manner as the butt material was prepared.
Secure the pulled out strand of body material behind the gold bead. Once secured wrap the body material rearwards to where the butt material was tied off. Then advance the material back to the rear of the gold bead, tie off and remove the excess material. Its O.K. to overlap the butt material slightly with the body material.
Counter wind the rib forwards and secure and tie off directly behind the gold bead head
Select two strands of peacock herl and tie them in by the tips directly behind the gold bead. Wind 2-3 wraps of the peacock herl, tie off and remove the excess material. Tying the peacock herl by the tips gives a fuller effect to the peacock herl.
Whip finish and apply head cement to the fly directly behind the gold bead head.
Trim the sparkle yarn extending over the eye equal to the length of the gold bead head.


 Steve and I came up with this pattern over breakfast one morning. Due to our collaborative efforts I christened the pattern the "Collaborator". Stomach samples the previous day had shown the fish to be feeding upon a light orange brown chironomid pupa with a prominent red butt. Local anglers often refer to pupae of this color as the "carrot" chironomids. The red butt of the chironomid pupa is a residual feature left over from the larval stage and is often prevalent on many species of chironomids. A size 10 or 12 pattern tied on the Tiemco 2457 hook nicely imitated these 1/2 to 5/8 inch long pupae. This is an excellent hook for all of your chironomid patterns, due to its' large gape and short shank. It hooks and holds fish remarkably well. Fish this pattern on a dry line with a leader equal to the depth of water you are fishing.
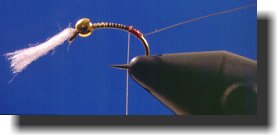 The success of this pattern is due in large part to the materials involved. We used frostbite to create the butt and body of the pattern. Frostbite is an excellent material for imitating chironomid pupa as it nicely simulates the shinny translucence of the natural pupas. The body color is a rusty brown frostbite, color number 61. The 1/8" gold bead head and copper ribbing add to simulate the trapped gases the pupa uses to ascend to the surface to emerge and sink the pattern quickly while maintaining a slim natural profile. However it was
 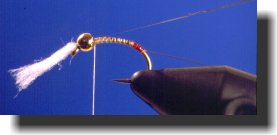 the thread selection that put the finishing touches to the fly. As the frostbite is translucent the thread color had an effect of the overall body coloration. The light tan thread nicely complimented the body material and provided the right color match.
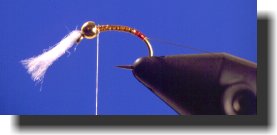
 Tie in the ribbing material directly behind the gold bead. Secure the ribbing material along the hook shank by moving the thread rearwards partially down the bend of the hook to simulate the semi curved nature of the emerging pupa.
 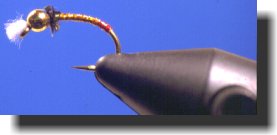 Select two strands of peacock herl and tie them in by the tips directly behind the gold bead. Wind 2-3 wraps of the peacock herl, tie off and remove the excess material. Tying the peacock herl by the tips gives a fuller effect to the peacock herl.